Homemade Coconut Pops (Dairy-Free Ice Cream)
Full-fat coconut cream and plant-based milk blend into a smooth base that freezes solid. Four ingredients are enough for a clean coconut flavor.
Creamy Coconut Flavor Homemade
Homemade coconut pops deliver a cold and creamy treat that tastes like a tropical vacation. Combining coconut cream with plant-based milk creates a smooth base that freezes beautifully. The unsweetened coconut flakes add real texture and flavor without overpowering sweetness. Brown sugar balances the richness, while vanilla brings out the coconut’s natural taste. Whisk everything thoroughly so ingredients blend evenly before pouring into molds. This simple method makes sure you’re not just making frozen treats – you’re getting genuine tropical creaminess in every bite.
Coconut Cream Makes It Rich
Making homemade coconut pops is a delightful way to enjoy a frozen treat that combines the tropical flavors of coconut with a rich, creamy texture. This recipe relies on simple, quality ingredients that work together to create a smooth, indulgent frozen dessert. The combination of plant-based milk and coconut products creates a luxurious base that freezes into perfectly creamy pops. These pops can be served elegantly in serving bowl sets* for a memorable dessert presentation.
Ingredients:
Use unsweetened coconut flakes for this recipe so you can control how sweet the pops turn out, since the brown sugar and coconut cream already add plenty of sweetness. The quality of your vanilla extract really makes a difference in how the final pops taste, so use pure vanilla instead of imitation. Also, make sure to stir your coconut cream really well before measuring it, because the cream and liquid parts tend to separate in the can. For the best results, use fresh ingredients and check expiration dates, especially on the coconut cream, so your finished pops have the best texture and taste.
Molds Make Freezing Easy
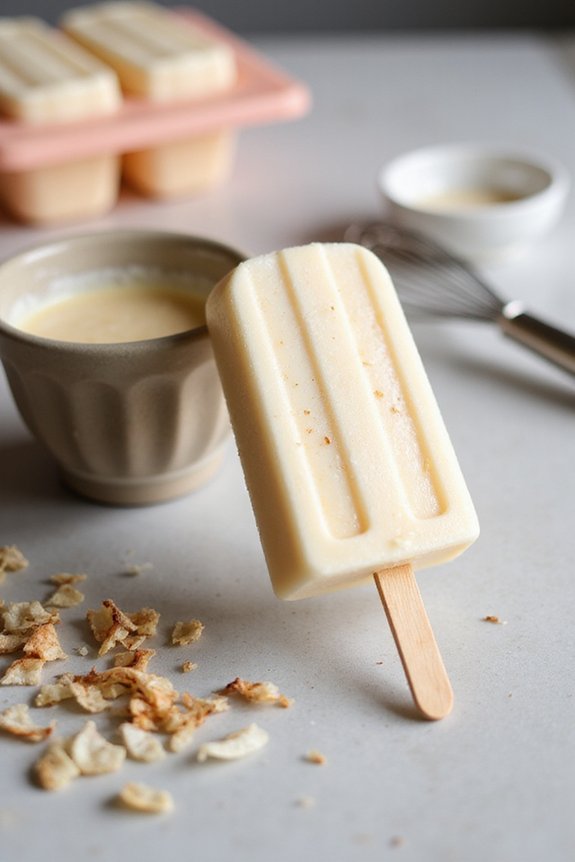
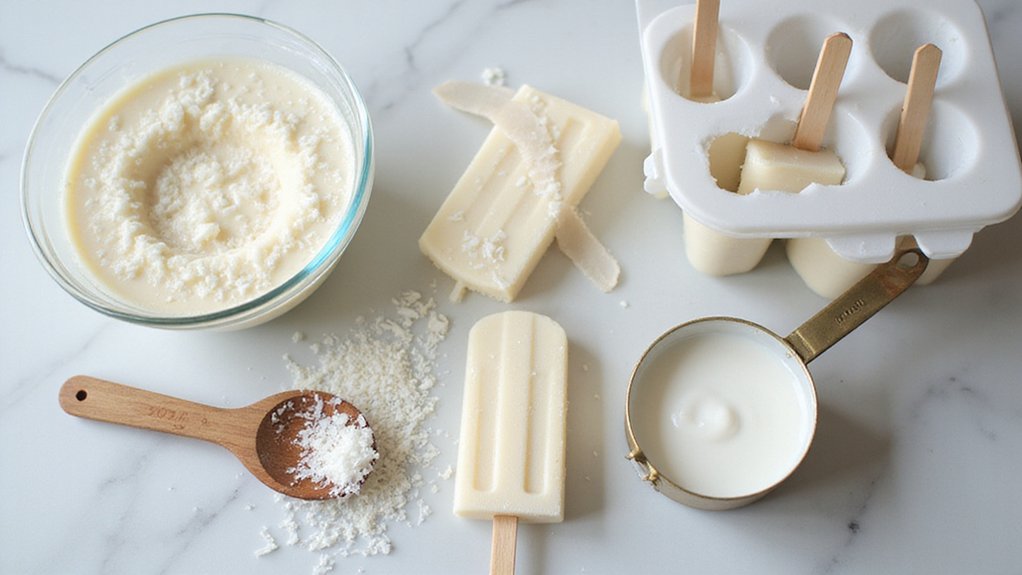
Begin by combining 1 1/3 cups of unsweetened almond milk with 1/2 cup of unsweetened coconut flakes, 1/4 cup of brown sugar, 1 teaspoon of vanilla, and one 13.5-ounce can of coconut cream in a bowl. Whisk these ingredients together until well blended and smooth. The combination of the creamy coconut cream and plant-based milk creates a rich base, while the coconut flakes add texture and deeper coconut flavor to your pops.
Once your mixture is thoroughly combined, pour it directly into popsicle molds. Using molds made just for popsicles makes freezing easy and ensures even freezing throughout. Fill each mold to just below the rim, leaving a small amount of space to account for expansion as the mixture freezes.
Place the filled molds in the freezer and allow them to freeze for at least 6 hours. For best results, freeze them overnight so they’re completely solid. Once frozen, remove the popsicles from the molds by running warm water over the outside of the mold or gently wiggling the sticks until the pops release. Store any remaining popsicles in an airtight container in the freezer for up to two weeks.
Customize Your Pops
You can customize this recipe by adding cocoa powder, coffee, or lime juice to the base mixture. These additions create different flavor profiles while maintaining the creamy texture. Simply add your chosen ingredient to the mixture before whisking and pouring into molds.
Pair With Fresh Tropical Fruit
Once your coconut pops are frozen solid, serve them alongside fresh tropical fruit to make a complete, refreshing dessert. Pair them with mango, pineapple, or passion fruit because their bright acidity cuts through the richness of the coconut cream. Simply slice your chosen fruit and arrange it on a plate next to your pops. The contrast in temperatures – cold frozen pops against room-temperature fruit – makes each bite more interesting. You can also blend leftover fruit into a quick coulis for drizzling, which adds extra flavor and visual appeal without requiring much effort.
Final Thoughts
Making homemade coconut pops is straightforward, and the result tastes so much better than store-bought versions because you control exactly what goes into them. You’ll know every ingredient, which matters if you’re avoiding additives or allergens. Try different coconut cream brands since they vary in thickness and flavor intensity. Store your finished pops in an airtight container for up to two weeks, though they’ll likely disappear much faster.
Ingredients
Instructions
- 1 Whisk coconut cream vigorously to recombine any separated fat. In a medium bowl, combine coconut cream, almond milk, brown sugar, and vanilla. Whisk until sugar fully dissolves, about 2 minutes.
- 2 Stir in shredded coconut.
- 3 Pour mixture evenly into 8 ice pop molds (about 1/3 cup each). Insert sticks.
- 4 Freeze for at least 6 hours, or overnight, until completely solid.
- 5 To unmold, run warm water over the outside of each mold for 15-20 seconds and pull gently. Serve immediately.
You May Also Like