Easy Date Oat Bars (No-Bake, 15 Minutes)
 All Vegan Dinners160 recipes
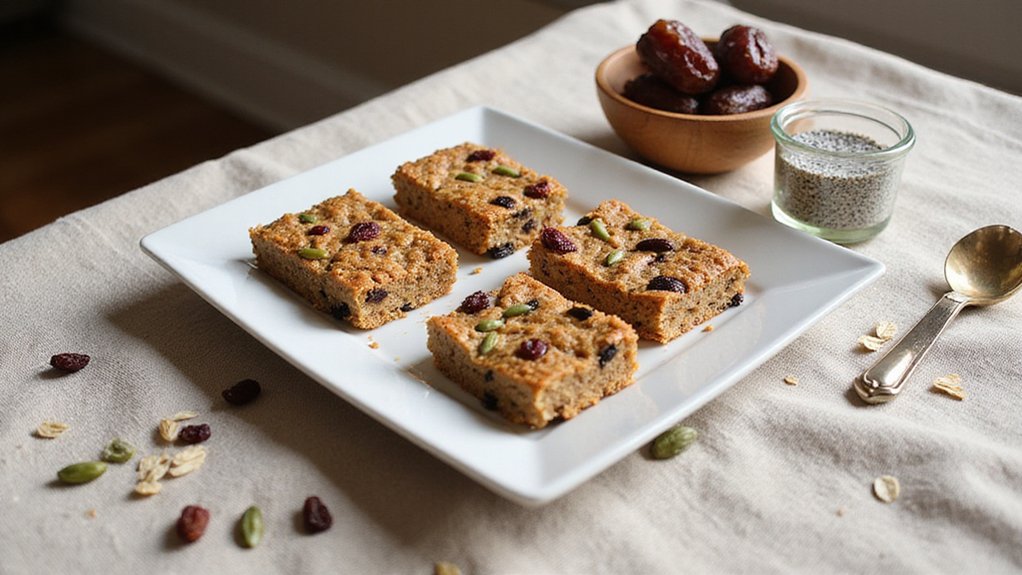
Medjool dates and rolled oats form the base of these no-bake bars, held together with chia seeds. Ready in 15 minutes with no oven required.
Easy, Wholesome, No-Refined-Sugar
You’ll often find that making nutritious treats at home gives you complete control over what goes into your body, and these date oat bars are a perfect example of that freedom. I skip refined sugar entirely by using pitted dates as my sweetener – they’re naturally sweet and packed with fiber. The rolled oats provide wholesome carbs, while sunflower seeds and raisins add nutrients and texture. Chia seeds create a binding gel that holds everything together without eggs or butter. You’re combining whole ingredients that nourish you, not processed fillers that leave you hungry an hour later.
Chia Seeds Create Natural Binder
These wholesome date oat bars combine simple, natural ingredients to create a nutritious and satisfying treat. The recipe relies on whole grains, dried fruits, and seeds to deliver both texture and flavor, while chia seeds serve as a natural binder that holds everything together without requiring eggs or refined binders. Each ingredient plays a specific role in creating bars that are chewy, hearty, and packed with nutrients.
Ingredients:
I’d grab unsweetened raisins and raw sunflower seeds for the best nutritional profile. Medjool dates work best for this recipe since they blend into a smooth paste more easily than other varieties. Make sure your rolled oats are certified gluten-free if you have dietary restrictions. The chia seeds need to be mixed with water ahead of time so they can fully hydrate and develop their gel-like consistency, which is important for the bars to come together properly during baking.
Microwave Dates for Smoothness
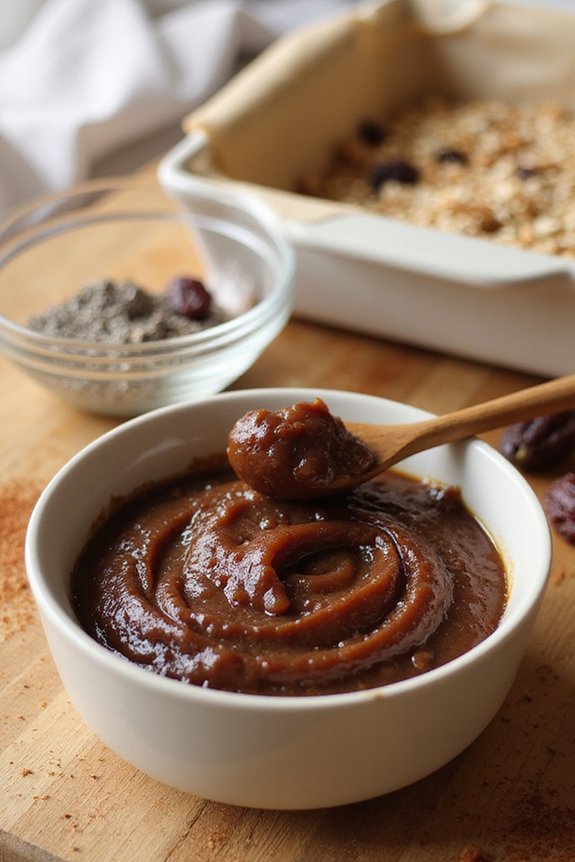
Begin preparing your Easy Date Oat Bars by activating the chia seeds, which will work as a binding agent. Combine 1/4 cup chia seeds with 1 cup water in a small bowl and set it aside to form a gel. While the chia mixture develops, place 20 pitted dates with 1/2 cup water into a microwave-safe bowl and heat on high for 30 seconds. This brief heating softens the dates a lot, making them easier to blend into a smooth, spreadable paste that will spread evenly throughout your bars.
After microwaving, blend the date and water mixture until it’s completely smooth. This paste becomes the flavor base of your bars, providing natural sweetness and binding power. In a separate bowl, combine 1 cup rolled oats, 1/2 cup sunflower seeds, 1 cup raisins, and 2 tsp cinnamon. Stir the date paste and prepared chia seed mixture into the dry ingredients until everything is mixed together well.
Preheat your oven to 400°F and prepare an 8×8″ baking dish by lining it or greasing it thoroughly. Pour the combined mixture into the prepared dish and bake for 30-35 minutes until the bars are set and lightly golden. Allow the bars to cool completely before cutting them into pieces of your desired size for easier handling and storage.
Try Dried Figs Instead
If you’d like to switch things up from the date paste, dried figs make a great substitute that’ll give your oat bars a slightly different flavor and texture. Use the same amount of figs as you would dates, then microwave them with water until softened. Blend until smooth, just like the date paste. Figs contain natural sweetness and fiber similar to dates, so your bars will hold together well. The result tastes earthier and slightly less sweet, which some people prefer. I’ve found this swap works great, especially when you’re craving something different but still want those chewy, satisfying oat bars.
Pair With Almond Butter Dip
While experimenting with different fillings like figs can definitely shake up your oat bar game, you shouldn’t overlook what you pair with them once they’re baked. I’ve found that almond butter dip makes these bars really special. Simply blend smooth almond butter with a touch of maple syrup and vanilla extract, thinning it with a splash of plant-based milk until you get the right dipping consistency. The creamy richness works well with the chewy dates and nutty oats, while adding protein that keeps you satisfied longer. Trust me, once you try dunking these bars into that smooth dip, you’ll never serve them plain again.
Final Thoughts
These Easy Date Oat Bars have become a staple in my kitchen because they’re nutritious, delicious, and honestly pretty hard to mess up. You’ll find yourself reaching for these bars as a quick breakfast or afternoon snack because they give you sustained energy from whole ingredients. The combination of dates, oats, and chia seeds works together to keep you satisfied longer than processed alternatives. I encourage you to experiment with the recipe – swap raisins for cranberries or add nuts for extra crunch. Once you master this basic formula, you’ll realize how simple homemade energy bars can be, and you’ll never go back to store-bought versions. For those interested in baking more gluten-free treats at home, a gluten free bread maker* can help you create nutritious baked goods with confidence.
Ingredients
Instructions
- 1 Combine chia seeds with 1 cup water in a small bowl, stir well, and let sit for 10 minutes until a thick gel forms.
- 2 Place dates in a bowl with 1/2 cup warm water and soak for 5 minutes, then transfer dates and soaking water to a food processor and blend into a smooth paste.
- 3 In a large mixing bowl, combine rolled oats, raisins, sunflower seeds, and cinnamon, then add the date paste and chia gel and stir until everything is evenly coated and the mixture holds together when pressed.
- 4 Line an 8×8-inch (20×20 cm) baking dish with parchment paper, transfer the mixture into the dish, and press down firmly with damp hands or a flat spatula into an even layer about 2 cm thick.
- 5 Refrigerate uncovered for at least 30 minutes until firm, then lift out using the parchment, place on a cutting board, and cut into 9 equal bars.
- 6 Store in an airtight container in the refrigerator for up to 5 days.