Best No-Bake Vegan Granola Bars (Chocolate Dipped)
Oats, peanut butter, nuts, and dried fruit are pressed into bars and finished with a chocolate dip, no oven needed. They set in the fridge within 30 minutes and keep well through the week.
No-Bake Convenience Saves Time

Ditching the oven entirely, you’ll find that no-bake granola bars save you serious time and keep your kitchen cool. Instead of preheating and monitoring baking times, you simply mix your ingredients, press them into a pan, and refrigerate. This method works because the cold firms everything up without heat – perfect for hot days when you don’t want extra warmth. You’ll have finished bars ready in under thirty minutes, compared to nearly an hour with baking. Plus, no-bake versions give you better control over texture since you’re not fighting oven temperatures.
Tofu Base Saves Money
Making homemade vegan granola bars is an affordable and nutritious option for those seeking a plant-based snack. By using tofu as a protein base, these bars become both budget-friendly and satisfying, providing essential nutrients while keeping costs minimal. The combination of simple, accessible ingredients creates a texture that is both chewy and crispy, making these bars a versatile treat for any time of day. A stainless steel tofu press* can help you achieve the perfect moisture level in your tofu for optimal bar consistency and texture.
Mix Ingredients by Hand
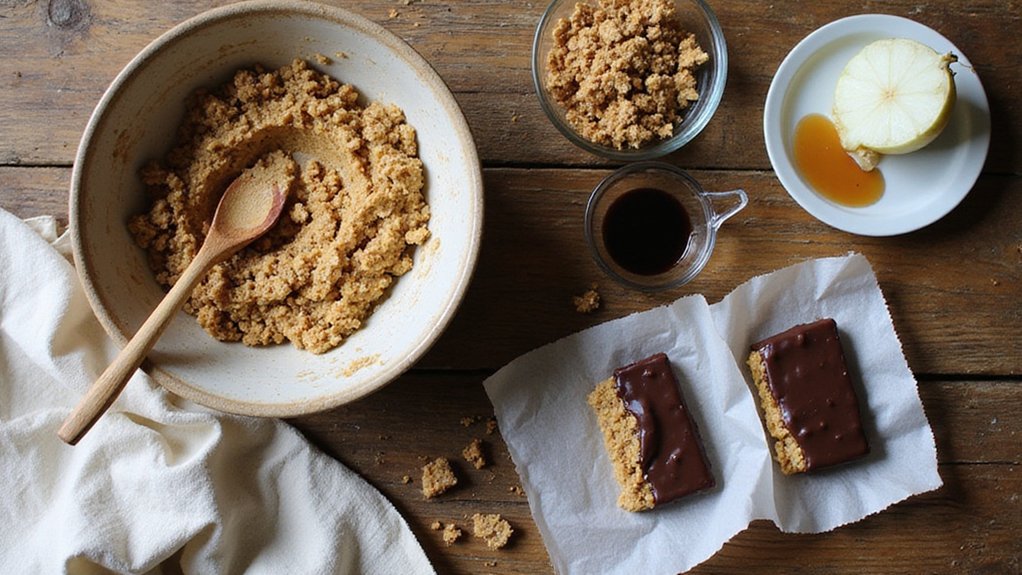
Combine 240 g (2 1/2 cups) old-fashioned rolled oats, 60 g (1/2 cup) sliced almonds, 2 tablespoons hemp hearts, 2 tablespoons chia seeds, 60 g (1/4 cup) dried cranberries or raisins, and 125 g (1/2 cup) natural peanut butter in a large bowl. Using your hands, mix all ingredients thoroughly until they are evenly combined. This step matters for getting the right texture for your granola bars.
I always mix by hand rather than using an electric mixer, because a mixer will overwork the mixture and make it too soft and gooey. Hand-mixing lets me keep better control over how it feels and makes sure all ingredients get mixed in properly without breaking down the oats too much. I work through the mixture deliberately, pressing the ingredients together until they form a cohesive mass that holds together well. If you prefer using equipment, vegan stand mixers* are available as an alternative to traditional mixers for plant-based baking.
Once the mixture reaches the right consistency, you’re ready to shape and prepare the bars. The mixture should be firm enough to hold its shape but still moist enough to work with easily.
Swap Peanut Butter for Tahini
If you’re looking for a nuttier flavor or need to avoid peanuts altogether, you can swap the peanut butter for tahini in equal measure – that’s 125 g (1/2 cup) of tahini instead. Tahini brings a deeper, more complex taste that works great in granola bars, though it’s slightly thinner than peanut butter. You’ll notice the mixture becomes a bit looser, so add an extra tablespoon of oats to fix that and keep the right texture for rolling. This substitution keeps everything vegan while giving you a more sophisticated twist. The sesame flavor pairs wonderfully with chocolate, so your no-bake bars will taste better.
Pair With Coconut Yogurt Dip
While tahini gives you that sophisticated sesame flavor, you’ll want something creamy and complementary to serve alongside your bars, and that’s where a coconut yogurt dip comes in. I combine full-fat coconut yogurt with a touch of vanilla extract and maple syrup to create a rich, tangy companion. The creaminess balances the nuttiness perfectly, and the subtle sweetness won’t overpower your bars’ chocolate coating. I’ve found that chilling the dip for at least an hour helps it firm up nicely for dipping. This pairing turns your granola bars into a dessert that feels more indulgent than it actually is.
Final Thoughts
Making homemade granola bars doesn’t have to be hard, and I’ve walked you through every step so you can create a treat that’s actually better than store-bought versions. You’ve got all the skills now to customize these bars with your favorite nuts, seeds, and dried fruits. The chocolate dip adds that polished finish without needing any baking. Store them in an airtight container, and they’ll stay fresh for a week. Once you master this recipe, you’ll realize how easy it is to skip the processed stuff and make something delicious that actually feeds your body well.
Ingredients
Instructions
- 1 Line a 20 x 20 cm (8 x 8 inch) baking pan with parchment paper, leaving overhang on two sides for easy removal.
- 2 In a large bowl, combine rolled oats, sliced almonds, hemp hearts, chia seeds, and dried cranberries. Stir to mix.
- 3 In a small saucepan over low heat, warm the peanut butter, maple syrup, and coconut oil together for 2-3 minutes, stirring until smooth. Remove from heat and stir in vanilla and salt.
- 4 Pour the warm peanut butter mixture over the dry ingredients and stir until every oat is coated. Transfer to the prepared pan and press down very firmly with the back of a spatula or your hands – pack it as tightly as possible.
- 5 Refrigerate for at least 2 hours, or freeze for 45 minutes, until completely firm. Lift the slab out using the parchment overhang and cut into 12 bars.
- 6 Melt chocolate chips and 1 teaspoon coconut oil in a microwave-safe bowl in 30-second bursts, stirring between each, until smooth. Dip one end of each bar into the chocolate or drizzle over the top. Place on parchment and refrigerate for 15 minutes until the chocolate sets. Store in an airtight container in the fridge for up to 1 week.